November 27, 2020
Continuous preview of your Flutter app as a webapp
Aloïs Deniel

Any mobile application developer encountered the difficulty of deploying his app to his customer's device. Being able to follow the advancement of developments is really important for a customer, and for you to track issues at the earliest stage possible.
But this process can take a lot of time, particularly on iOS, where you have to set up various flavors to create different bundles that have to be signed with multiple certificates. It is really a painful process... Today I will propose you another way to let your clients keep track of the development by continuously deploying your mobile application as a web app, accessible from any web browser!
Adding web support
First step is to make sure that your application works with the web target.
You can find a documentation on the official Flutter website that explains how to compile a Flutter app for the web.
Several plugins are not yet compatible with the web target, as well as file system. You may have to adapt your codebase by testing kIsWeb constant to provide alternatives in those cases.
You may encounter also CORS issues if you rely on a web API. Make sure your API sends the required HTTP headers for your local address and hosting endpoint (see below).
Adding DevicePreview
To gives to your customer a good idea of your mobile application, I would encourage you to add device_preview to your application. This will mimic real devices from a browser.
You can use the kIsWeb constant to activate it only for web release. I would also recommend you to customize the default functionnalities provided by DevicePreview (for example by removing devices that are out of scope).
 runApp(
    DevicePreview(
      // Only for web, or debug on mobile
      enabled: kIsWeb || !kReleaseMode,
      devices: [
        // Only iOS and Android devices
        ...Devices.ios.all,
        ...Devices.android.all,
      ],
      style: DevicePreviewStyle(
        background: BoxDecoration(color: Color(0xFFF4F4F4)),
        toolBar: DevicePreviewToolBarStyle.dark(
          // Hides buttons from the toolbar
          buttonsVisibility: DevicePreviewButtonsVisibilityStyleData(
            darkMode: false,
            language: false,
            settings: false,
            toggleKeyboard: false,
            accessibility: false,
          ),
        ),
      ),
      builder: (context) => MyApp(),
    ),
);
Hosting with Firebase
In this example, to deliver our preview to our customer, we will host the web build output onto Firebase.
Start by creating a new project from the Firebase console. The name will be part of the url, so choose a cool one for your project!
Now that your have a project, install the CLI for Firebase.
Make sure to login from the CLI by running firebase login, go to your project directory and execute the firebase init command. Choose Hosting, then Use an existing project and choose the project you created before from the Firebase console.
This will initialize two configuration files : firebase.json and .firebaserc.
Continuous deployment with Codemagic
Now that we have our working web app ready, and a hosting solution, we're ready to automate the deployment!
Codemagic is probably the easiest solution when it comes to CI/CD solution for Flutter, and sure we're gonna use it!
Once you have an account on Codemagic, create your project from the dashboard and connect your git repository to it.
Don't worry about the configuration, there are two ways to configure your project: with the UI, or with a yaml configuration file. We will take the second option since it makes it reusable and shareable between projects!
So, create a codemagic.yaml file at the root of your repository and set its content with the following :
workflows:
  default-workflow:
    name: Web preview
    max_build_duration: 60
    environment:
      vars:
        FIREBASE_TOKEN: 'TODO' # Here we need an encrypted token, see below
      flutter: beta
      xcode: latest
      cocoapods: default
    scripts:
      - name: Build web package
        script: |
          # build web
          # cd your-path <-- If your project is in a subdirectory
          flutter config --enable-web
          flutter packages pub get
          flutter packages pub run build_runner build --delete-conflicting-outputs
          flutter build web --release --dart-define=FLUTTER_WEB_USE_SKIA=true
          firebase deploy --token "$FIREBASE_TOKEN"
          cd build/web
          7z a -r ../web.zip ./*
    artifacts:
      - promod/build/web.zip
      - promod/flutter_drive.log
To allow Codemagic to deploy to Firebase, you have to authorize it beforehand with a dedicated token. To create one, use the following command :
> firebase login:ci
Instead of having this token in your configuration file, we will encrypt it. This prevents someone else that would have access to your repository to get full access over your Firebase project with this token.
Codemagic has a built-in way to encrypt keys. Simply select the Encrypt environment variables menu from the settings view of your project and paste your token into the field.
After choosing Encrypt you will get a new value in the form of Encrypted(Ed6...U). Copy this value (with the Encrypted part) and past it into you yaml file :
workflows:
  default-workflow:
    name: Web preview
    max_build_duration: 60
    environment:
      vars:
        FIREBASE_TOKEN: 'Encrypted(Ed6...U)' # Paste your encrypted token here
      flutter: beta
      xcode: latest
      cocoapods: default
    scripts:
      - name: Build web package
        script: |
          # build web
          # cd your-path <-- If your project is in a subdirectory
          flutter config --enable-web
          flutter packages pub get
          flutter packages pub run build_runner build --delete-conflicting-outputs
          flutter build web --release --dart-define=FLUTTER_WEB_USE_SKIA=true
          firebase deploy --token "$FIREBASE_TOKEN"
          cd build/web
          7z a -r ../web.zip ./*
    artifacts:
      - promod/build/web.zip
      - promod/flutter_drive.log
That's it, we're ready !
Build and deploy
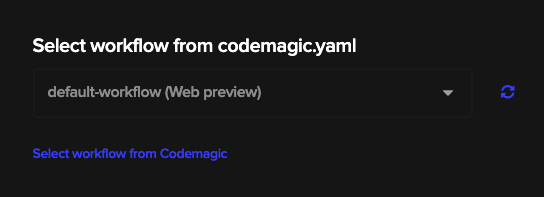
You can start a build manually from the Start new build on Codemagic, and make sure to choose Select workflow from the codemagic.yaml configuration file.
You can also automatically trigger a build on each commit, it is up to you to fine-tune the frequency of updates you want to deliver to your customer.
More info on Codemagic build triggers
Conclusion
I hope that it will help you improve interactions with your customers or beta testers, and your productivity. You can of course adapt this idea to any CI/CD or Hosting solution!